Hi there.
If you are participating in the UKS Sponsor Blog Hop, you may have arrived here from UKScrappers, if so welcome. To be in with a chance of winning a prize from UKS, please don't forget to leave us a comment, ensuring you also include your UKS User name.
We will also randomly select one person who comments on our blog during 1st November who will win a £15.00 voucher to spend in our store.
Is it too early to mention Christmas?
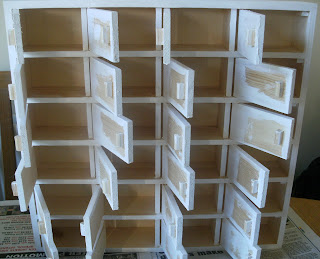
Hope not as we have for you an Altered Wooden Advent Calendar. The solid structure of these advent calendars are perfect for bringing them out each year and for hiding treats behind each door. The compartments are big enough for holding a funsize chocolate bar, treat sized packet of sweets or a small toy.
So lets get on to decorating them.
1. Paint the sides of the advent calendar, inside area of each opening, and all sides, frames and edges of the doors using White Acrylic Paint. We used Baby wipes to spread the paint as they are really useful in getting an even layer of paint over large areas, but using a paintbrush is also fine. Set aside to dry.
2. Once dry, paint the door handles and a small area around the base of the door handles in gold Metallic Acrylic Paint.
3. Using a scrap piece of cardstock 3½” wide x 2” high as a template, cut a small rectangle out for the door handle. As the doors will be opening, it is best not to have the template/your patterned paper too close to the door hinge. (Note each handle will be in a slightly different place).
4. Using 4 different sheets of co-ordinating Christmas papers, cut 6 rectangles out of each sheet 3½” wide x 2” high.
5. Using the cardstock template, mark out on each rectangle of paper where the door handle will go.
6. Ink all of the edges of the rectangles and place onto each door in a random pattern.
7. When happy with the placement of the rectangles adhere to the doors.
8. Using a set of number stamps, stamp the numbers 1 – 24 onto Acetate then cut out each number.
9. Place the numbers either randomly or in numeric order onto the doors.
10. Decorate each door using festive elements such as snowmen, Christmas Trees, Snowflakes, Baubles, Presents, Holly and Ivy etc from co-ordinating papers.
11. Highlight certain elements such as snowman scarves, Christmas trees with stickles, and add adhesive pearls and crystals.
12. When content with the placement of each number and element, adhere to each door. Use 3D Foam pads or Glue Dots to mount some elements to add some dimension.
13. The outside frame and the borders between each row of doors of the Advent Calendar can be left painted, or if you wish you can add a paper border. This can be done by cutting a piece of paper into ¼” strips and adhering to firstly the outside frame, and then the borders between doors.

Wooden Advent Box can be found here
Supplies used for the Blue Advent Calendar:
Echo Park "Everybody Loves Christmas" Collection - found here.
Papers used for the doors : Wrapping Paper, Scallop Stripes, Christmas Bells, Snowman
Papers used for the border frame : Bright Stripe
For decorating : Christmas Garland paper, Element Stickers, Journal Cards, Trim the Tree, Adhesive Pearls, Chipboard Snowflakes, Chipboard Hearts, Stickles
Supplies used for the Pink Advent Calendar:
Cosmo Cricket "Jolly By Golly" Collection - found here.
Papers used for the doors : Breezy Freezy, Play Day, 2 x Silly Chilly
Papers used for the border frame : Sweater Weather.
For Decorating : Borders Paper, Elements Paper, Off cuts of the Play Day Paper used on the doors, Chipboard Snowflakes, Chipboard Hearts, Stickles
General Tools/Supplies needed:
White Acrylic Paint , Metallic Gold Acrylic Paint, Mixture of Christmas Themed Embellishments / additional co-ordinating paper to cut out elements, Ink for edging, Adhesive (Double Sided Tape, Strong wet glue, Glue Dots and 3D Foam Pads), Acetate Sheet, Number Stamps, Black Stazon Ink Pad
A full list of Sponsors participating UKS Sponsors Blog Hop and more information on prizes can be found here.
Don't forget to be in with a chance of winning a prize during the UKS Sponsor Blog Hop, you need to leave us a comment anytime during 1st November (please also include your UKS User Name) and also comment on all of the other participating Sponsor blogs and the UKS thread.
Please hop on over to A Sprinkle of Imagination to see the next project for you.
Just a reminder to those of you that are local to us (Huntingdon, Cambs) that Anna Bowkis will be teaching at our next Workshop on Sunday 27th November. More details can be found here
Happy hopping!


